Friday, July 22, 2011

TFS 2010: Test Manager Web Access

TFS 2010 has introduced many new features, and one of them is the Team System Web Access (TSWA) that is installed by default when you install TFS 2010 and is accessible through the URL: “http://servername:8080/tfs/web”. (This was available in previous versions of TFS, but you have to install it explicitly.)
Also Visual Studio 2010 offers an excellent tool for the testers for carrying out the testing activities: Microsoft Test Manager. It offers complete end to end testing of the application and managing the testing artifacts in Team Foundation Server. With Team Foundation Web Access (TSWA) all the data that is present in TFS can be viewed within the browser and there is no need to install Visual Studio Team Access or any other client in the machine. Thus, management people or people at remote locations can easily access the information related to project.

However, Team System Web Access provides feature to view the various artifacts, but it doesn’t provide the feature to view the artifacts created by using Microsoft Test Manager i.e. Test Plan and Test Suite. So, there is a gap between Team System Web Access and Test Manager, and again we are landed at the same point, if people want to view how testing is going-on or what approach is being followed, they have to get this data using Microsoft Test Manager and they will end up installing the client in their machines.

Solution to this problem is Test Manager Web Access. Test manager Web Access is a plugin to Team System Web Access that enables the users to view the artifacts created within Microsoft Test Manager. It gives exactly the same view of the Test Plan and Test Suite hierarchy as displayed in Microsoft Test Manager.

After adding this plugin to the Team System Web Access a new tab “Test Manager” (as shown in figure below) is displayed in the Team System Web Access site.


Clicking on the Test Manager tab, user is able to view the same Test Plan and Test Suite hierarchy as visible in Microsoft Test Manger. Here, if user clicks any node in the tree structure he/she will be able to view the test cases present under that particular Test Suite or Test Plan.


However, currently there are few limitations to this plugin. Users can only view the Test Plan or Test Suites and the test cases present in them but they cannot edit or modify it. This plugin is completely for viewing purpose.
It might help people who don’t have Microsoft Test Management client installed but interested in data present in it.

Tuesday, February 15, 2011

"Export Test Cases from TFS to Excel".... now available for DOWNLOAD

Thanks all for having look on my blog and appreciating my effort.
All these days I was getting emails from people asking about where they can download this tool.
As I mentioned before also that I was working on few modifications in the tool and also I was bit busy, so got bit delayed... :)

But now the wait is over. "Test Case Export to Excel 1.0" is now available for download along with few enhancements.

As mentioned in the previous post, user has to first connect to the Team Foundation Server and then to the Team Project. After connecting to the Team Project, the Test Plans were populated in the dropdown box; and based on the selection of the Test Plan the Test Suites at the root level were being populated in the next dropdown box. Thus, the user has the limitation to select only the Test Suite present directly under Test Plan, also all the test cases that were present under the selected Test Suite and Sub Suites will be exported.

But now in the enhanced version i.e. "Test Case Export to Excel 1.0" user gets the complete view of the Test Plans and all the Test Suite in the form of tree structure, similar to the way it is displayed in MS Test Manager. Also, user is now having the flexibility select the test cases he/she wants to export. He/She can either choose to export the test cases present under the selected Test Suite or to export test cases present under selected Test Suite and its Sub Suites. Below is the screenshot of the enhanced version of the tool.


If you want to download the tool you can download it from the following codeplex site:
http://exporttfs2excel.codeplex.com/

Please post your comments or suggestions on this tool. Also, if you face any issues in the tool, please let me know.

Sunday, December 5, 2010

Exporting Test Cases from TFS to Excel... Made easy with... "Test Case Export to Excel"

It’s been a long time since I blogged.

In fact, it’s my first blog after joining Accenture. Just enjoying the work experience and learning new things. In this span I learnt couple of new tools and technologies, and one of them is Team Foundation Server 2010.

For those who are not aware of what Team Foundation Server is? Here is a brief introduction; Team Foundation Server (commonly abbreviated as TFS) is a Microsoft product for collaborative software development projects and offers source control, data collection, reporting and project tracking.

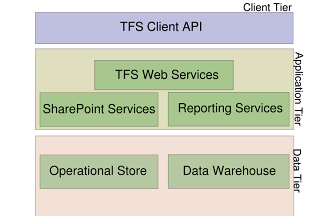
Team Foundation Server works in three-tier architecture: the client tier, the application tier and the data tier. The client tier is used for creating and managing projects and accessing the items that are stored and managed for a project, however TFS does not provides any user interface for this tier but exposes web services which client applications can use (e.g. Visual Studio Team System). The application layer contains the web services that are used by the client applications. It also includes a web portal and a document repository facilitated by Windows SharePoint Services. The web portal, called the Team Project Portal, acts as the central point of communication for projects managed by TFS. The document repository is used for both project items and the revisions tracked, as well as for aggregated data and generated reports. The data tier is SQL Server Standard Edition installation that provides the persistent data storage services for document repository.

Activities in Team Foundation Server revolve around Work Items. Work Item is a single unit of work that needs to be completed. Work Items can be of different types like Task, Requirement, Test Case, Bug, etc.

Visual Studio 2010 Ultimate offers an excellent tool for testers for carrying out the testing activities: Microsoft Test Manager 2010. It offers complete end to end testing of the application and managing the testing artifacts in Team Foundation Server.

Team Foundation Server (TFS) 2010 enables the users to manage test cases as Work Item(s). The complete description of the test case along with steps can be managed as single Work Item in TFS 2010.

Before migrating to TFS 2010 many test teams will be using MS Excel to manage the test cases (or test scripts). However, after migrating to TFS 2010, test teams can manage the test cases in the server but there may be need to get the test cases into excel sheet like approval from Business Analysts or sending it for review to a person who is not having access to the organization’s VPN.

Similar problem is been faced by me and my team, that once Test Cases are created in TFS there is no provision to export them to MS Excel. Thus I created an API “Test Case Export to Excel

“Test Case Export to Excel” enables the users to export the test cases present in TFS as Work Item(s) to excel sheet. Thus, the users will have backward compatibility with the process they were using.

“Test Case Export to Excel” follows the concept:

  • A Team Project consists of Test Plans.
  • A Test Plan contains Test Suites.
  • A Test Suite can contain Test Cases or Sub-Suites which in turn can contain test cases.

Image below shows the hierarchy explained above:

“Test Case Export to Excel” can export all the test cases present in a test suite to a excel file. If the selected Test Suite contains any Sub-Suite(s), then all the test cases present in the sub-suite(s) will also be exported to the excel file.

“Test Case Export to Excel (Beta)” is built on .NET Framework 4.0. Thus, .NET Framework 4.0 is required to be installed on the client machines to run “Test Case Export to Excel (Beta)”.

If .NET Framework 4.0 is not present on the client machine, then at the start of installation user will be prompted to install .NET Framework 4.0.

“Test Case Export to Excel (Beta)” is a GUI based simple tool that guides the users to export test cases from TFS to MS Excel.

“Test Case Export to Excel (Beta)” starts with screen as shown below:

1.1 Seleting the “Source”

Source for “Test Case Export to Excel (Beta)” is the Test Suite in Team Foundation Server that contains the test cases.

For selecting the Test Suite you are required to connect to Team Foundation Server and then connect to a Team Project.

For connecting to a Team-Project click the ellipses (…) button next to Team-Project text box. You will be presented with a screen shown below with option to connect to a Team-Project.

If there is no Server present in the dropdown box then click the “Servers…” button to add a Server.

You will be presented with dialog to “Add/Remove Team Foundation Server”.

Click on “Add…” button to add details of Team Foundation Server you want to connect.

In “Add Team Foundation Server” dialog you can enter the details of Team Foundation Server that contains your Team-Project.

After successfully connecting to Team-Project all the Test Plans present under the selected “Team-Project” will be populated automatically in the “Test-Plan” dropdown box. (If there are no Test Plan present in the dropdown box then the selected Team-Project doesn’t contains any Test Plan).

Select a “Test Plan” from the available Test Plan(s) in the Test-Plan dropdown box. Based on the selected “Test Plan”, Test-Suite dropdown box will be populated with all the Test-Suites present in the Test Plan.

Note: Only the Test Suites present directly under selected Test-Plan will be populated in the Test-Suite dropdown box. No Sub-Suite(s) present under any of the Test-Suite will be populated. However, during export if the selected Test-Suite contains any sub-suite(s), then the test cases under the sub-suite(s) will also be exported.

1.2 Seleting the “Destination”

Destination is the location where the excel file with exported test cases will be saved.

Select the folder location using the “Browse…” button where you want to save the file.

Specify a valid file name for the excel file.

1.3 Exporting

After entering both “Source” and “destination” details click on “Export” button.

If the fields are populated correctly, export process will start; otherwise error message will be displayed and you are supposed to correct the error(s) before you proceed.

During export, mouse cursor will be shown in busy state. The export may take some time depending upon the data to exported and network speed.

After successful export, a confirmation message will be displayed.

Product information i.e. version detail and developer information is available by clicking on “About” button.

Current product version is “Beta” version.

However, there are some known issues with the current version.

  • If there already exists a file with same name as specified by the user in the specified location, then a dialog box is displayed to replace the file with “Yes”, “No” and “Cancel” buttons. If user clicks “Yes” button, the existing file is replaced with the new one; whereas if user clicks “No” or “Cancel” button, application throws “Fatal Error” and terminates.
  • If client machine is having version of MS Office higher that 2003, then a compatibility warning is displayed with “Continue” and “Cancel” button. If user clicks “Continue” the excel file is saved successfully; but if user clicks “Cancel”, application throws “Fatal Error” and terminates.

I will try to address the above mentioned issues in the upcoming version with few more functionalities.

Friday, September 26, 2008

Security threats in your daily INTERNET life


Internet has revolutionized the life of the people all around the world. About 80% of the data on the internet is due to e-mail. Today every user on the internet surely having an e-mail ID. A lot of communication either related to business or personal issue takes place over the Internet. But in general users of the internet only knows the ways that is sufficient to carry out the work, they are not aware of the security threats present all around them. Here I’m mentioning some of those security threats…

Lottery wining e-mails:

Now a-days most people are receiving e-mails stating that they have won a huge sum of money in the lucky draw or sender’s grandfather had left the huge amount for him/her and with your help that person can get that money and in lieu of that you will get some share in that huge amount. This thing is called as Social Engineering. The sender of the e-mail takes you in confidence and then directs you steps for attaining the amount. The sender tries to fool you and instead of giving money to you, actually wants money from you. The sender first asks for your personal details as your name, the mailing address, phone number, photo identity proof that may be either the passport or driving license, etc. When you go ahead with this first step the sender then asks for the processing fee for the papers, and after that asks you to collect the money in person by coming over there. Many persons are fooled and suffered a lot from all these fraud e-mails. Some who believed these fraud people lost their huge sum of amount and who went there for money kidnapped over there and their family members were asked for ransom, while some others even lost their lives in all this. On the other hand the information given by you is being used in the terrorist activities. Only your photograph is changed from the identity proof given by you and rest all things remains same, thus the terrorist does all the activities on your name.

So, in future whenever you get this type e-mail that is offering you money always mark it as spam and delete it.

Banking over the Internet:

Another threat over the internet is related to online banking. The online banking where on one hand facilitated their customers, but on the other hand increased the threat to transmit the sensitive information over the internet. However a high care is taken to prevent the misuse of user’s information but again some unsocial agents deploy the same social engineering to get your sensitive information regarding your bank account details. The idea here deployed is sending an e-mail, saying that due some technical problems or some other problems your online account is disabled and you can re-activate it by clicking the link below, and logging in to your account. The link in the email takes you to the bank’s website for logon. But actually the website, on which you have reached from the link in the e-mail, is not the authentic website of the bank but is actually the fake website that looks exactly same as the bank’s website whose purpose is to get the user’s log id and password, so that he/she can access your bank account for your funds. The technical term for this in computer’s world is known as Phishing. Thus when you enter your account’s username and password on the fake website it is sent to the sender of the e-mail and you are simply shown a simply error message. In this way your bank account’s security is compromised.

Thus, if you are getting this type of notification, there is no need to panic. If you have activated your account for online banking then simply open a new browser window and type in the URL of your bank’s online banking and then logon to your account to check your account. One thing you should keep in mind to never click on the link available in the e-mail. Never go to bank’s online banking website by clicking to any link in any e-mail or on any web page that is not believed to be authentic. If you have received these types of phishing e-mails then always inform the technical support department of the bank to take appropriate steps.

Job Offers:

Another trap to get money from the people is fake job offers, especially from abroad. In this, the unsocial people collect individual’s data from job portals that he/she has put on the job portal like Monster.com, Naukri.com, Shine.com, etc. for jobs. In this, an e-mail is communicated to the individual stating that his/her profile matches with the requirements of the job openings in their company, and they offer you to go forward on the process to join the company. Generally the process consists of a telephonic interview after that those people demand for processing fee for the papers necessary to join the company and also ask fee for visa to work in their country. Once the payment is received from the person, then no response is made from these fraud people.

So, whenever you receive such email, always check the authenticity of the email. Search for the company profile over the internet. After consulting with some knowledgeable persons reply or go forward on such matters.

Social Networking:

A lot of social networking sites are point of attraction to the people now a day, like Orkut, Wayn, Facebook, etc. These services where made a platform for friends to meet and, discuss and share their emotions but also made the personal information about the people public. Whereas option is available on these sites to show the information you want, but that also is not 100% guaranteed. As there are scripts used for all these security related tasks and an expert programmer can easily fetch all your personal data. I’m not saying that you should not use social networking sites but be cautious while submitting the information on these sites. Special care must be taken by the girls and ladies while posting the information and photographs on these sites. A lot of cases have been heard regarding theft of the photographs of girls from these social networking sites and misused over other sites. Another thing you should also keep in mind that you should never trust the person on the other side if you do not know him/her personally, never reveal your phone number or mobile number to that person. Even if you have met your childhood friend on these sites, it may be possible that it is not the same person whose name is written over there and whose photograph is displayed on the profile. I myself have seen three profile of my friend on the internet with his name and photograph on all the three profiles; out of these only one profile was authentic that was created by himself rest others were fake and were made by unsocial people on these sites.

So, from next time always be careful in using these sites and do keep in mind what I told above.

Some important tips for using Internet:

  • Always remember to sign out of all your account. Many people simply close the browser window in hurry instead of signing out, and think their account is safe. But this not the case, the session remains valid as long as the valid cookie (used for managing user’s session on the internet) remains on the user’s computer. A cookie is invalidated by signing out of the account. If due to some problem you have lost your internet connection or due to some other problem not able to sign out then simply clear your private data, for this simply select the option from the tools menu. The main thing is to delete the cookies from your browser and your session is invalidated.
  • Always think twice before you activate your account for online net banking; do you really need it! These things are not for fun. As far as possible access your net banking account from your personal computer or laptop only. If any time you have to access your account from cyber café or some others computer then use the on screen keyboard utility to enter your password to prevent password theft.
Precautions:
  • Never pay attention to lottery wining e-mails, mark it as spam and block sender.
  • While banking over internet never disclose your sensitive information as your login password, profile password, etc. to anyone.
  • Use the on-screen keyboard utility when accessing your account from public computer or some other's computer.
  • If you receive a job-offer always research about the company over the internet, and also consult some learned person before replying.
  • Never disclose your personal information on social networking sites, as there is risk of information theft.


Internet has emerged as a very powerful tool for communication, but by knowing these security related issues you can take full advantage of it, and will not have to suffer in future.

Wish you happy and better internet experience…

Monday, September 15, 2008

Planning network for home or office…. Go for


The current time is where everyone likes to be connected to their loved ones and the Internet has played a very vital role in this. Now almost all middleclass families are having computer in their home and also have access to the internet. Similarly the support of internet to your business can give it new heights.

Now the condition is again changing, instead of having a single system, there is more than one system and every system likes to be connected to the internet. So, now whenever you are planning for the internet connections, and if you are going to use it regularly, then go for the broadband connection. It will give you a good experience and will be economical also. There’s lot of offers available in the market so it’s difficult for one to make choice.

Selection of ISP:

The broadband service provided by BSNL and MTNL are for stationary access, whereas the services provided by the mobile companies as TATA Indicom, Reliance, Idea, etc. allows you to access the internet on the move. So depending upon your need select your connection. I suggest that you must go for the stationary connection, provided by BSNL and MTNL over their basic phone connection, as here are very few moments when you will have to access the internet on the move unless you are from corporate world. You can also go for the broadband connection provided by the mobile companies but that will be not economical. Stationary broadband will give you good bandwidth (speed) so you can have good working experience. The service provided by mobile service providers through the USB modem or device not gives the good speed. So, you are not going to work smoothly with the interactive multimedia content, like watching videos, or video conferencing with your loved ones.

Selecting Customer Premises Equipment (CPE):

The broadband service provided by BSNL and MTNL requires you to setup ADSL modem for accessing the service. I will suggest you to purchase the modem having more than one LAN port and also having Wi-Fi port this will help you access the service on more than one system and also wirelessly. However this let you spend some more money but it will be beneficial for the future.

Typical Wi Fi Router with inbuilt modem (front view)

Rear view

The most important thing over here is the Wi-Fi! As it will be good for you, because the future is of Wi-Fi. Maximum devices are now being Wi-Fi enabled like the mobile phones and printers. This also lets you get of the rid of the wiring overhead for accessing the network. It also lets you easily add devices to the network. All laptops are now Wi-Fi enabled, for accessing Wi-Fi network on desktop computer just use the USB Wi-Fi Adapter, which is also easily available. It lets you to move out of the rooms and provides you access to the network in your whole premises. The most important is placement of the Wi-Fi router (modem). The modem acts as the Wi-Fi router (or Access Point) for the devices in range. The placement of the router (modem) plays a dominant role for better reception of the signal.

The router will be placed in the open location so that you get good signal reception. If possible place it in the center of your home or office at a height of 1.5 to 2 meters, which will give you better signal strength.

Security:

Now the most important thing with the Wi-Fi is the security. You think that you placed the router at the best location and getting good signal reception all over your premises that’s all! You think that the signal seizes to extend out of your premises! It is not the case; the signal continues to extend beyond the boundary of your premises. Thus to protect your data and internet connection, security is the most important concern. The most common wireless encryption standard is Wired Equivalent Privacy (WEP), but it has shown to be easily breakable even when correctly configured. So, Wi-Fi Protected Access (WPA and WPA2) became the standard in 2003 and is now shipped with almost all Wi-Fi enabled equipments. By default the Wi-Fi routers are configured in the “open” mode, i.e. anyone who is in the range of the Wi-Fi signals can access the network and if the person having some technical knowledge then he/she can change the settings of your router. Thus it is advisable to first change the IP address range of you router and then change the SSID i.e. the network name and then set the network access key. Also it will be better to hide the access point so that it is not discoverable from the devices in range.

So whenever you are going to set up small networks in home or in your office then go for Wi-Fi. It is the best option available with least overhead. The wireless router with inbuilt modem will let you to connect the devices with each other and also to the internet. So turn your home or office into a “hot spot” for you.

Saturday, July 12, 2008

Vehicle Tracking System using GPS


As it has always been a logistic nightmare to track out the vehicles on the way. In order to solve this problem of tracing out the vehicles on the way a vehicle tracking system based on Global Positioning System (GPS) has been devised. The system uses Global Positioning System as its base technology. For the communication purpose the system is set to be configured with the available terrestrial network.


Working of GPS:

The feasibility studies were started in 1960’s. The Pentagon appropriates funding for this system in 1973 and the first satellite related to this topic was launched in 1978, and the system declared fully operational in 1995.

The official name of the system was NAVSTAR GPS (Navigation Satellite Timing And Ranging Global Positioning System) and is developed by US Department of Defence. The Global Positioning System is a worldwide positioning system based on the functioning of the 29 satellites. These satellites keep transmitting the signals at a particular frequency to the earth. The GPS listeners, on earth tune to that particular frequency and listen to the signals sent by the satellite. For positioning any device which is equipped with the GPS listener, signals from three or more satellites is required. The signals from three satellites determine the latitude and longitude of the device on the earth. But the signal from four satellites determines the latitude, longitude and altitude of that device on the earth. More the signals from the satellite more will be the accuracy of the position of the device.

Use of GPS for vehicle tracking system:

For locating or tracking the vehicles, the system uses the GPS as its base technology to locate the vehicle on the earth. For this the vehicle is equipped with the GPS listener. Once the vehicle is located on the earth then the next step is to send this information to the control centre for the mapping of the vehicles. That’s here the terrestrial network comes into scene. The system uses the terrestrial network such as the available CDMA or GSM mobile network for communicating with the control center.

Once the vehicles is located then it is it sends its information such as the latitude, longitude, altitude, speed(derived), etc. to the terrestrial network. The terrestrial network then sends this information to the control center where the vehicle is mapped on the electronic map on the computer. If there is some information that is to be send to the person in the vehicle then it is sent to the terrestrial network. The terrestrial network sends this information to the device in the vehicle. For this the system use the Short Messaging Service (SMS), thus the information that is sent by the control centre to the person in the vehicle appears as SMS to him. Thus, it is fully two way communications between the control center and the device.


The location is represented by the Position Fix. A position fix is based on real – time satellite tracking and is defined by set of co-ordinates. It changes as the GPS receiver moves. Position shows the approximation of the receiver’s true location.

The path which the receiver must follow is denoted by the waypoint. A waypoint is the set of co-ordinates entered into the receiver. The position fix is matched with the waypoint within some allowed error limits. If it is within the error limits, the vehicle is following the correct path unless it is on wrong path and the control centre is sent information about this.

Friday, July 11, 2008

Your own Website, your own dedicated server, at your HOME…

You just typed in the URL in the address bar of the web browser and the site opened in front of you. Have you ever thought that from where the page came from or where it is lying? So, how do you feel if something like this happens for your website? Sounds great! But for this you have to buy the web space to place your web site over there, then buy the domain name, by which the people can access your stuff worldwide.


But you yourself have a computer which has lot of space available. Also you are having an internet connection. Can you use your own computer to act as server for hosting your website? Yes, sure you can do this; after all you have spent a lot of money for your computer, so it’s the time for you to exploit it!


There are many issues that must be handled for hosting the website from your home PC, which I shall take on in this article. The most important issue is that people access your stuff using your broadband internet connection. In 90% of the cases your ISP provide you with the dynamic IP, i.e. every time you get a different IP address when you connect to the internet. So it will be difficult for the DNS to map your computer appropriately. This is the main issue, which is handled later in this article.


For getting started its assumed that you have made you own website and its now ready to be published on the internet. In Windows XP Pro/2000/NT there is windows service available called Internet Information Service (IIS) for hosting website but in Windows 98/XP Home this is not available so, I’m using the third party server for publishing the server.
Here I am using Apache Tomcat web server for the deployment of the web site.


Getting started…
First download and install Apache Tomcat on your computer. Just follow the typical settings for installation. To test whether the server is working properly fire a web browser window and type in the following: http://localhost:8080

You will see the Tomcat home page. Now it is sure that you your server is installed and working properly. Now place the folder containing your web files in the webapps folder inside Tomcat. The very first page i.e. the home page of your website must be index.html or index.jsp. If this is not the case then rename the home page file to index.html or index.jsp and also update the links in your web site for your home page.


Making your website accessible
You have to configure your system for making your website accessible for people on the internet. First of all you have to configure your firewall to allow the requests for your website. For this, if you are using any other program other than the Windows inbuilt firewall then configure it to allow connections for port 80 that is for HTTP (Web Service). If you are using Windows firewall as in Win XP then in its advances settings tick the Web Service (HTTP). Thus now your system is configured to handle HTTP request from outside.


Securing your system
As you allow people on the internet to access the content available on your system, it’s not safe regarding the security issues as there are many security loopholes present in Windows XP Pro. So, it will be better to get your windows updated with the security updates released by Microsoft. If you are having genuine copy of windows then use the automatic updates feature; else manually download the updates and install them.


Getting domain name
Domain names are nothing but the names by which the computers are referenced on the internet instead of IP address. IP addresses are used to uniquely identify the computers on the network; they are just like phone numbers. But having dynamic IP address its problem for DNS! This problem is handled with the concept of dynamic DNS. A lot of information is available on the internet regarding dynamic DNS and also there are many service providers for dynamic DNS. The concept behind dynamic DNS is that you open an account with the service provider and then create a host over there. Then you must download the dynamic DNS client and run on the system that you use for hosting websites and is having dynamic IP. Whenever the IP address of the system changes then the running client of the service provider updates your IP address in the provider’s DNS database so that your computer is correctly mapped to the proper IP address by the domain name. One such service provider is no-ip, that provides the dynamic DNS service. First you have to open the free account over there; once you are having account on no-ip, add host, select the domain name from the offered free domain names, then select port-80 redirect in the host type and enter port 8080 as Apache runs on port 8080. Now you are done.


Final step
Now go to apache webapps folder and rename the ROOT folder to some other name and rename your web application or website folder to ROOT. That’s all, now you are done. If everything that is explained above is right then startup the apache server and connect to internet; and your website is accessible from all over the world. To check fire a web browser window and type in the domain name of your web site that you have chosen and you will be presented with the home page of your very own website.


In this way without spending a single penny you can have your own website, your own dedicated server, at your very own HOME.